In this Silversmith course we are working exclusively with copper (go figure). At George Brown silversmithing refers to the techniques used in creating larger pieces of silver items such as plates, bowls, spoons, tea sets, etc. These techniques involve primarily different ways of hammering the metal to form it into your chosen design. The types of jewellery formed by this silversmith method are very different from what I had created in my "Silversmith" classes at The Devil's Workshop. I'd actually equate those techniques with George Brown's goldsmithing classes (where so far we are working with brass and silver!). Anyway terminology aside here are some of the projects from my Silversmith course at George Brown.
 |
| Creating the initial bowl shape out of a copper disk |
In our first project we created a bowl out of a sheet of copper by purely hammering techniques. The method of sinking stretches out the metal and thin the walls. I started by drawing concentric circles on the copper plate and hammering the bowl over a small concave groove (much smaller in diameter than the bowl) to slowly bring up the sides of the bowl. In between hammering I had to frequently anneal the copper because it hardened with every blow.
 |
| Checking the shape against my template |
After achieving the general shape I created a template of the bowl by tracing out half of the circumference at the mouth and used that to guide how deep the bowl would become. The goal was to create a hemisphere. In the second week I worked from the outside of the bowl (you can see the grid marks I drew in the photo below) and used a hammer to shape the bowl against a convex stake. This technique finishes both the inside and outside surfaces of the bowl simultaneously while shaping the bowl to the template.
 |
| Almost there, I'd say |
The bowl will be marked against it's template to see how close it is to a perfect hemisphere. After marking we will be free to change the design of the bowl by cutting an interesting edge out of the top, hammering designs into the walls of the bowl, or creating feet at the bottom for the bowl to stand on. There were some pretty cool designs on display in the classroom so I'll take a closer look next time.


 I learned how to make my first rubber mold in class which more or less followed the process described here. There were a few slight differences; The silicon rubber I used was heated to 305degF for 49 minutes (seven minutes per layer), and instead of using a mold cutting frame I just had the scalpel and hook. We were also taught to cut the two halves apart with an uneven edge to ensure a better fit when the two halves were put back together - sort of like keying the two sides.


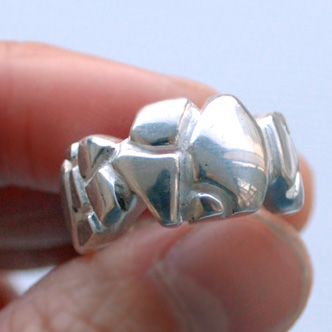
 The soldering went relatively well and none of it got into the grooves of the pattern, however I could have been more precise when wiring the three thin rings together into a stack to begin with. The middle piece was out of centre by a few fractions of a millimeter which was evident when I went to file the outside. I managed to file away the solder grooves from the outside except where they were intentionally left as part of the pattern on the top. Unfortunately You can see two thin dark lines on the inside of the ring where the solder grooves were. Eventually the instructor told me to stop filing because the ring was getting too thin. My OCD made that a challenge to do!