Saturday, January 09, 2010

Vintage Malachite Cuff Bracelet


This past holiday I was going through some of my mother-in-law's collection of "vintage" (i.e. no-longer-worn-but-can't-bear-to-throw-away) jewellery and came across this beautiful old belt buckle. I wasn't sure what the stone was made of but it looked a lot like malachite.  I was able to find some matching malachite beads along Queen street and came up with a design that I think complements the original design of the buckle.

Thursday, January 07, 2010

More Deviling at the Workshop

After having such a great time at the wedding band workshop I signed up for a 6-week Silversmith class at the Devil's Workshop in the fall.  It was such a nice escape to spend 3 hours there every Tuesday night, focusing on just the small projects in front of me and spending an evening with other women.  The cozy studio has room for only 6 students which I thought was a perfect size for an intimate setting.  

Silver ring


Cufflinks for Mike

Over those six weeks I worked on three projects. I started with the silver ring which taught me some new techniques such as drilling, sawing small shapes, and testing the hammering effect on silver.


Next I used matching Tiger's Eye cabochons to create a pair of cufflinks for my Mike which was a real challenge when it came to setting the stones. I was really proud of the results and Mike has already worn them at least once!


Earrings for me!


Finally I finished off with a pair of leaf earrings for myself.  It was really cool dipping the gleaming silver pieces into a clear sulfur chemical solution and watching the metal instantly turn black!  I then lightly polished the leaves and all of the more recessed points were left with the dark patina.


Sunday, January 03, 2010

The Devil's Workshop: Wedding Bands

Last year when Mike and I got married we made our gold wedding bands at the Devil's Workshop just a 5 min walk away from us on Queen St. West.  My brother put the idea in my head when he told me about some friends that had tried it out.  Having never done any type of silversmithing before I was very skeptical that we could make wedding bands that didn't look...well...home-made.  It was too intriguing to pass up though, and since we both wanted very simple wedding bands we signed up for the 1-day wedding band workshop.


Above you can see the two strips of 18k gold that we transformed into our wedding bands.  In the top right photo is the cozy studio where we spent the afternoon.  Below I'm sawing the strip of gold down to the right length for my ring.  Next came filing and sanding the edges to make them nice and square.


We used a raw hide mallet and ring mandrel to pound the metal into shape.  This was a cute photo that the owner of the studio took.


Using ring-bending pliers (round on one half and flat on the other) we brought the ends of the ring together to form a tight fit.  Here's where we got to see just how good a job we had done squaring off the ends of the gold strips.  To properly solder the ring together it was crucial that the ends butted up against each other without gaps.

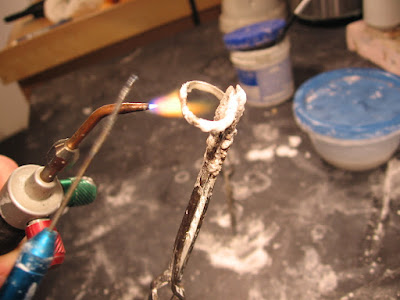
Here Mike is soldering his ring together.  Prior to applying heat the ring was dipped in flux to clean the metal's surface.  The flame caused the flux to bubble and dry up which is why it looks coated in white foam.


Then it was my turn to work the flame...


Once the rings were soldered and cleaned we spent a considerable amount of time pounding the rings on the mandrels to shape them into perfect circles.  Next came polishing with emery paper for what felt like most of the afternoon.  It was the most tedious portion of the workshop, and pretty exhausting on the hands and arms, but it was necessary to eliminate the larger scratches before the final polishing step (shown below).

Using the polishing wheel to bring out the shine!
And now....(drum roll)...check out these rings!  They look like we bought them in a store!  I'm so glad we decided to sign up for this workshop and would recommend it to anyone who wanted to try something special.  Oh, and if you decided you wanted little diamonds set flush with the surface, or some pattern etched into the ring for detail, you could always leave your rings with the owner to do for you after the workshop.  We chose to keep our wedding bands plain and simple and were thrilled to take them home with us that very day.

Our 18kt gold wedding bands, made with love.


Saturday, January 02, 2010

BlueTuque Skateboard


I designed this skateboard in 2007 as a birthday gift for Mike. The logo was inspired by my beloved blue winter toque which was sadly lost later the same year.  Mike had mentioned on several occasions wanting to try out skateboarding (which surprised me) so I thought this would be a cool surprise.  It was printed by BoardPusher in Denver, Colorado who specializes in custom skateboards.   The wheels, trucks, and bearings were purchased at So.Hip.It.Hurts on Queen Street. I felt pretty lost when I first went inside the store because I don't know a thing about skateboards but the staff were very friendly and helpful.


I drew Mike wearing the baseball cap that we bought on our trip to San Francisco and the zippie I gave him for Christmas. I drew my character wearing my awesome knitted blue toque and my equally awesome green and lavender canvas shoes.  I scanned the drawings and then used Photoshop to add colour and shading.


I originally put the logo against a purple background some friends suggested that it was a touch too feminine, especially where the gradient fades to white, creating a pinkish hue.  After considerable debate I switched to a green background but sneaked the purple into the font instead.  I also changed Mike's glasses to shades.


The design was then uploaded to the BoardPusher site and they printed the deck in just one day **BUT** it took 2.5 weeks for it to reach me because of a holdup at the border (not cool). The delay at the border meant that the skateboard didn't come until a week after Mike's birthday.


The deck comes with just a roll of grip tape and two of the company logo stickers so I had to buy some additional hardware before the skateboard could be ridden.  That's when I headed to So Hip It Hurts on Queen street where I bought the white trucks, wheels, and bearings. The BoardPusher stickers were a good finishing touch.


Mike and I took the skateboard for a spin in the parking lot near our place.  It was terrifying. I kept thinking I would fall back on my tail bone but Mike seemed to get the hang of it pretty quickly.  Still, every time he lost his balance I cringed.  And then any time we put a scratch on the board I cringed some more.  I guess that's the problem with designing a skateboard - I have to expect that it will get scuffed up!