Thursday, January 13, 2011

Lost Wax Casting: Koi Cuff Bracelet (cont'd)

I was able to cast my koi cuff braclet in sterling silver this week - how exciting! In my previous class I soldered a massive sprue at the base of the bracelet and then set the mold. I ended up keeping most of the bridge as support so there will be a considerable amount of silver I can recover from this casting. One of my classmates took a final photo of the wax piece just before I said goodbye to it for good.

Preparing the piece for casting
 There was a fair bit of prep before the actual casting process took place. I had a bar of fine silver that had to be cut with copper to make sterling silver which is harder and more durable. It took a painfully long time to melt down such a large amount of silver and my hand was pretty crisp from holding the torch.

Here I am with my instructor Shao getting ready to melt the sterling silver beads with the torch.  In the right photo I'm adjusting the flame before pointing it down into the centrifuge.


After the piece was cast I had to wait another 20 minutes for it to cool down before plunging it in a bucket of water and retrieving the bracelet. That felt like a verrrry long 20 minutes.  Here is the bracelet with the massive sprue sawed off (which took an hour with a tiny jewellery's hand saw!).

Bracelet just after casting (fine silver coating)


Monday, January 10, 2011

Copper Spoon: Forging Technique (complete)

(cont'd from here) Voila - the final product! I might have used the wrong type of planishing hammer the first time I was finishing the surface of the spoon but it created a pretty neat texture on one side. While shaping the bowl I used a different planishing hammer which took out the initial rougher marks. However I decided to keep the texture along the handle because the contrast was more interesting.


Thursday, January 06, 2011

Lost Wax Casting: Koi Cuff Bracelet (cont'd)

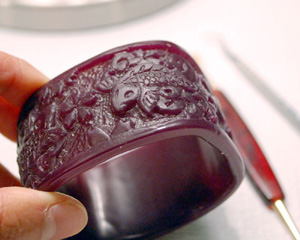
I was able to dedicate a lot of carving time to this bracelet over the holiday season (I love that my office shuts down for Christmas!).  The bracelet is coming along nicely and I've spent many hours carving, digging, and scraping away wax.  I'm still pretty timid with the tools so I end up making multiple passes over the entire bracelet, slightly deepening the grooves each time.  Not very efficient but I'm getting good practice, that's for sure.
The right-side koi is beginning to take shape

Another 3 hours spent adding details such as scales and fins

The wax model is almost ready for casting. I've spent a considerable amount of time hollowing it out and taking down the thinnest sections of the bracelet to about 1.2 - 1.5 mm. Before the holidays the wax model weighed 33 grams. Now it weighs 15 grams, and will be even lighter once I cut out the bridge and create the opening in the bracelet for my wrist. The weight in sterling silver is approximately 10.4 x the weight in wax so there is definite incentive to get this piece lighter.


In the right-hand photo you can see the neat texture that my instructor suggested I add to the inside of the bracelet. It took about 45 minutes just to do that detail alone but it really gives the bracelet a nice finished look without requiring me to file the finished piece from the inside.